Tuesday, July 26, 2011

Enchiladas

It's been hot here recently. Really unpleasantly hot. Definitely not the sort of weather that inspires me to cook or bake. But, we still have to eat... so I've been doing a lot of grilling to keep the heat outside and stay cool in the kitchen. About a week ago I grilled a whole chicken. Although I don't eat much meat, our kids are definitely carnivores and you really can't beat the price of a whole chicken for the amount of meat you get.

Assembled enchiladas - ready for baking

So I had some leftover chicken and I was trying to figure out what to do with it. I wanted something that I could easily bake in our toaster oven rather than the full-size oven. I hit upon the idea of enchiladas which are pretty easy to assemble and are a tasty meal. This recipe is entirely invented; I did not have any reference. I don't know how "authentic" it is, but it's tasty anyway.

Enchilada Sauce - for 8 enchiladas

Ingredients
1 small onion, chopped roughly
1 or 2 dried chiles (I used Ancho, because that's what I had on hand)
2 tsp oil
8 ounces tomato sauce
1 tsp ground cumin
1 tsp ground coriander
1 clove garlic, minced or pressed
1/4 tsp salt
1/4 tsp dried oregano
1/2 cup water

Filling
8 corn tortillas
About 1 1/2 cups diced chicken, beans, cheese, etc.
Oil for frying

Instructions
Saute the onion and dried chile in the oil until the onion begins to soften. Add the dried spices and tomato sauce, cook over low heat until the onion and chiles are soft. Add water as necessary to keep the sauce at a pretty thin consistency. After the onion has softened and the flavors are blended, use an immersion blender or regular blender to make the sauce more homogeneous.

Assembly and Baking


To assemble the dish, you'll need about 8 corn tortillas and about 1/8 inch of oil in a small skillet. Heat the oil until it is hot and then fry each tortilla for just a few seconds until it softens. Remove each tortilla from the oil and allow it to drain on a paper towel. Next you'll want to pour about one third of the sauce over the bottom of your pan to cover it. The pan I made mine in is one that came with my toaster oven - about 7 x 10 inches, and only about 1/2 inch deep.

Finally take your filling - in my case diced chicken - and roll it inside each tortilla, placing the tortilla into the pan with the rolled edges down. Pour the remaining sauce over the rolled tortillas, and top with grated cheese. Bake for about 30 minutes at 350 degrees.

Friday, May 20, 2011

Homemade Fruit Wine

Well, today was one of THOSE days. You know the kind... fortunately there's a little light at the end of the tunnel, and I'm enjoying a nice glass of wine. Winemaking really can be quite simple if you want it to be, and this is about the simplest wine I know of. You need a little bit of specialized equipment and a couple special ingredients to put it all together. I get most of my brewing and winemaking stuff from Midwest Supplies.


This recipe is made with fruit juice concentrate, which is easy, readily available, inexpensive, and of reliable quality.

You'll need a fermentation vessel that's 20 or 30% larger than the batch you want to make. A food-grade bucket with tight-fitting lid and a hole drilled for an air-lock will do the trick. Then you'll need an air-lock to keep all the nasty bugs out. For secondary fermentation/aging, you may want a glass jug or carboy with matching airlock as well - this reduces the oxygen exposure for your wine as it clears. You may also want a bit of food-grade tubing for siphoning the wine when transferring, although you can also just pour it if you don't mind a bit of sediment.

For special ingredients, you'll want some potassium metabisulfite (or sodium metabisulfite), which comes in powder form or tablets ("Campden tablets"). This helps prevent spoilage and oxidation as the wine ages. You'll also want some potassium sorbate, which inhibits yeast reproduction after your fermentation is complete, so you can sweeten the wine a bit without it continuing to ferment.

And then you'll need wine bottles and corks (and a corker), or some other way to store your wine for aging. If you just want to try this out without spending a lot of money, you can get screw-top bottles and caps rather than investing in a corker.

Blueberry Pomegranate Wine (approx. 10.5% alcohol by volume)

Ingredients for one gallon
3 12-ounce cans of Old Orchard brand Blueberry Pomegranate frozen juice concentrate, thawed
1 cup sugar
Water to reach one gallon
1 packet of dry Montrachet wine yeast

Procedure
Sanitize your fermentation vessel (there are many different cleaners and sanitizers available - I use a no-rinse variety that's essentially the same as Oxi-clean).

Pour the thawed juice concentrate into your fermentation vessel and top off with water up to one gallon. Sprinkle the packet of yeast on top of the juice mixture, and put the lid and airlock on the fermentation vessel. You should see fermentation begin within about 24 hours, depending on how warm your room is. After about a week, no more bubbles should be visible coming through your airlock, which means likely the fermentation is complete. At this point it's best to transfer the wine off of the lees (dead/inactive yeast and all that stuff at the bottom of the bucket) and into a gallon jug with less air exposure, again sealing with an airlock. If you believe fermentation is complete, you can stabilize with the potassium sorbate - directions should be on the sorbate container, and add the potassium metabisulfite - again, directions on the container. Allow to sit for another few weeks to clear all haze, and then you are ready to bottle.

Clean and sanitize 5 bottles per gallon of wine, and transfer the stabilized and sorbated wine into your bottles and seal. If you want a sweeter wine, it should be safe to add a simple sugar syrup at this point, to taste. I add about 1/2 cup of sugar per gallon to this recipe.

Wednesday, May 18, 2011

Homemade Cheese

A few years ago, I decided to try my hand at making cheese.  This is something that I really did just on a whim, because it sounded sort of interesting.  What I found out then is that it's a time-consuming process and the feedback is nowhere near instant.  To make a good hard cheese you have to be very patient to allow it to age.  There are, however, some cheeses that can be made quickly and consumed the same day.  I'll get to those in another post.  For this post, I wanted to describe my second attempt (successful this time) at making an aged hard cheese.


I got my start using a kit I ordered from the New England Cheesemaking Supply Company.  This kit included a book entitled Home Cheese Making by Ricki Carroll.  The book has quite a few recipes for different varieties and styles of cheeses, and walks step by step through the cheese making process.  The real weakness I see in this book, and in recipes I've found on the internet, is the lack of any real scientific method or description.  The biggest problem I have with the book and other recipes comes at pressing time - it will say "press at 25 pounds for 10 hours".  Well, as we all should know, pressure is measured as force applied to an area.  I guess these recipes all assume using a "standard" size mold, but that's a strange assumption.  The mold provided in the kit is circular, about six inches in diameter at the widest point.  So about 30 square inches in surface area.

On "cooking" cheese - the temperatures involved for many cheeses are so low that you don't want to heat them on the stove, but rather in a water bath directly in your sink.  I have a 3 gallon pot that fits nicely inside one side of my kitchen sink, and I can maintain temperature there quite easily by running hot water from the faucet.

Leicester Cheese

Ingredients
2 gallons whole milk
1 packet direct-set mesophilic starter or 4 ounces prepared mesophilic starter
2 drops cheese coloring per gallon of milk (I omitted this)
1 teaspoon liquid rennet or 1/2 rennet tablet diluted in 1/4 cup cool unchlorinated water
2 tablespoons cheese salt (I used kosher salt)

Technique
Heat the milk to 85 degrees F, add the starter and mix well. Cover and allow to ripen for 45 minutes.

Add the coloring, stirring well to distribute (I didn't add coloring to my cheese)

Add diluted rennet and stir gently up and down for a few minutes. Cover and allow to set at 85 degrees for another 45 minutes.

Cut the curd into 1/4 inch cubes. Stir occasionally for 15 minutes.

Increase temperature to 95 degrees slowly (no more than two degrees per five minutes). Maintain the temperature at 95 degrees for 30 minutes, stirring gently to keep the curds from matting together.

Pour the curds into a colander and let them drain for 20 minutes.

Place the mass of curd on a draining board and cut into slices to drain. Try to keep the slices at about 90 degrees by covering with a towel dampened in hot water. Turn the slices every 20 minutes for an hour.

Break the slices into one inch pieces and put them in a bowl. Stir for a few minutes, and then add the salt and stir for several more minutes.

Place the curds in a cheesecloth lined mold and press at 8 ounces per square inch for 30 minutes. Re-dress the cheese and turn over, placing back in the mold at one pound per square inch for 2 hours.

Re-dress the cheese, turn over, and press at 1 1/2 pounds per square inch for 24 hours.

Remove the cheese from the mold and peel off the cheesecloth. Dust with salt and air-dry for two to five days, until dry to the touch.

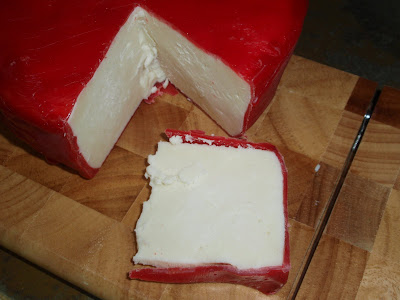
Wax the cheese and age it for 12 to 16 weeks.

Wednesday, May 4, 2011

Sourdough Bread

My wife grew up in the San Francisco bay area, so she's always had a thing for sourdough bread - especially the "extra-sour" varieties.  Unfortunately here in rural Minnesota it's hard to get anything resembling real bread at all, let alone a true sourdough.  So about ten years ago, I started experimenting with sourdough.  I really didn't have much luck with creating a starter from wild yeast around here - the resulting bread was always kind of heavy, didn't have great flavor, and the starter was hard to keep alive.

Maybe six or seven years ago, I ordered a starter from King Arthur Flour.  With this starter, I had somewhat better luck, but still not quite right.  I shared this starter with relatives in Kansas and California, and when I managed to kill it off through neglect, finally got some back last November.  I think the journey over the past seven years goes something like:

Vermont to Minnesota
Minnesota to Kansas
Kansas to Minnesota (I killed it!)
Minnesota to California
Minnesota to California (They killed it!)
California to Minnesota via Tennessee (I killed it!)

It seems to have gotten the nurturing it needed while out in California, and now I've got a quite healthy starter that makes a very good, very sour bread.  The biggest key now seems to be a really long fermentation and rise time, gradually introducing more flour for the yeast to feed upon.

In my kitchen, which is somewhere between 62 and 65 degrees in the winter time, it takes about 36 hours of total fermentation time before I'm ready to bake.  I'm hoping over the summer when it's warmer I can reduce that time by a bit.  The main idea here is to make sure your dough has actually doubled in size, regardless of the recipe's guidelines on time.  Sometimes it takes much longer than you might expect - these sourdough yeasts and bacteria are not very similar to commercial yeasts in their activity levels.  I think they simply multiply much slower than the commercial strains, meaning you have to treat them differently or you'll wind up with a really dense, not very flavorful brick of bread.

Six loaves of sourdough bread, fresh from the oven

Extra-sour Sourdough Bread

Reviving the Starter
I keep our starter in a 1 quart plastic container (covered) in the refrigerator.  I feed it about once per week, usually when I'm ready to bake bread.  Feeding involves splitting the starter (about 2 cups of starter) in half.  One half is either discarded or split and fed in the same way as the starter.  Mix the starter with 1/2 cup of cool water until it's dissolved and homogeneous.  Then add 1 cup of flour.  I usually use bread flour to feed the starter, although sometimes in a pinch I'll use all-purpose flour.  Now let it rest at room temperature, covered, for about 10 hours, or until the starter has roughly doubled.

Starting the Dough
Now comes the first feeding.  Split the starter again, taking about 1 cup of starter for your dough, and feeding the remainder as before.  The fed starter can go back in the refrigerator.

Using the 1 cup of starter, add 1 1/2 cups of water and again stir until smooth.  Now add about 3 cups of bread flour to the starter/water mix.  Stir until the flour is incorporated - it does not have to be perfectly even, you just want all the flour to be hydrated.  This dough can then sit, loosely covered, for about 4 to 12 hours.  Again the most important thing is watching the dough to see if it's doubled in size.  Sometimes this will take only a few hours for me, and sometimes it takes much longer.
Initial dough mixture after doubling in volume

Finishing the Dough
Now that the sourdough culture has been activated and is growing rapidly, you can add some more flour (to bring the dough to its final consistency) as well as salt and a little sugar to help boost the yeast activity.  You can probably leave the sugar out if you're willing to wait even longer for the final two rises.  For this recipe I dissolve 1 Tbsp kosher salt (or 2 1/2 tsp table salt) and 1 Tbsp white sugar in about 3 Tbsp hot water.  Then stir this salt/sugar/water mixture into the dough.

Now comes the hardest part, which is incorporating more flour into the mixture.  Here is where you have to let experience be your guide to get just the right amount of flour added.  It will probably take between 1 and 2 cups of additional flour - the most I've ever needed is 1 3/4 cups.  So start with 1 cup of flour and work it in, either stirring/kneading by hand or with a stand mixer.  Remember that this flour will suck up additional water as the dough rests, so it's ok for the dough to be a little softer and stickier than you'd expect.  I don't really knead the dough, I just make sure the flour is evenly mixed in.

Rise and Shine
So now you have the final dough - it needs another few hours to continue to develop.  Again time is less important than the actual activity.  Let it rest in the bowl, covered, until it has doubled (or more) in size.  My most recent batch I allowed about 4 hours and then it was ready for shaping, but sometimes I'll let it sit overnight.

Shaping the Loaf
After the dough has doubled, it's time to shape your final loaf.  Using a little flour, you should be able to split the dough in half and shape however you'd like - long and skinny for baguettes, a round boule, or even into a standard sandwich loaf pan.  I then spray with a little oil/cooking spray and cover with plastic wrap.  This is where waiting really pays off - when you think it's ready to bake, it probably could stand to wait another few hours. So let it keep rising.
Shaped loaves after rising overnight

Preparing for Baking
Preheat your oven to 450 degrees. You should start this about 30 minutes before you want to bake to ensure the entire oven is really hot. I have a baking stone that I place on the lowest rack of the oven, and a roasting pan on the floor of the oven (more about this in a second). If you don't have an oven thermometer, get one - they are only a few dollars. You want to make sure your oven is actually the right temperature.

Bring about 2 cups of water to a boil. You'll dump this hot water into the roasting pan when you put the bread in the oven. This creates a steam environment for the first half of baking that helps the bread develop a good crust and expand properly during initial baking.

Slashed loaves - note the one on the left has fallen just a bit
Before you put the bread in the oven, you'll want to slash the top of the loaves to allow the final "oven spring" to occur without tearing open the crust. Depending on how active your yeast is, this may or may not be a big deal. But I prefer to slash every time, just to give the bread more room to grow. I make a slash across the loaf every 1 1/2 to 2 inches using a very sharp knife dipped in water. I slash to about 3/8" deep - you do have to be careful while slashing the dough to make sure you don't deflate it, especially if it is fully risen and soft.

Baking
Slide the bread into the oven however you choose, and then immediately dump your boiling water into the roasting pan and close the oven door. I then set a timer for about 12 minutes, which gives the water a chance to boil off. At this point I'll rotate the pans to help the bread begin to cook evenly. If you're only doing 2 loaves, you may not need to rotate the pans/loaves, but I usually do six loaves at a time which is pretty crowded, and the loaves near the walls of the oven brown much faster than the loaves in the middle. I then rotate the loaves every 6 or 7 minutes until they look done - about 35 minutes of baking time in total. Then take the loaves out and allow to cool.


Some additional tips:

I love these teflon pan liners that are used to replace parchment paper. Nothing sticks to them, they're easy to clean up, and they make handling baked goods so much easier. I will usually bake 2 loaves on each pan. About 20 minutes into baking, I sometimes remove the loaves from the pan liner and bake them directly on my stone or the wire oven rack. That just helps make the bottom crust a little more crisp. The only problem with the liners is that they do stain if you get even the smallest nick in them, and the edges will soak up oil and scorch a little bit. But they seem to work fine regardless.

Be patient. The longer you allow your dough to rise, the more the flavor and texture develops. This isn't something that should be rushed.

If you want a bigger oven spring or a faster rise, you can add a bit of instant yeast (maybe 1/4 to 1/2 tsp) when you add the salt, sugar, and final flour. You'll still get most of the sourdough flavor, but also a more reliable rise and more dramatic oven spring.

If you want a shiny crust, you can brush (before baking) with an egg white diluted with water, or a thin corn starch mixture. I don't bother with this because it's just extra work and doesn't really affect the flavor in any way.

Tuesday, May 3, 2011

Strawberry Cream Cheese Pie

It's May, and strawberry season is just getting started. Today strawberries were $1.88 per pound at our grocery store, and I couldn't resist. Here's a pie recipe that I've been making for years because it's just really tasty. The cool cream cheese combines well with the fresh strawberries, and the cooked topping makes this a real delight. I believe this recipe originated in the Betty Crocker cookbook, but I've made some modifications over the years. The original recipe calls for topping with whipped cream prior to serving, which is very good, but maybe overkill. The original recipe is also far too sweet for my tastes, containing 2 cups of sugar. I like the sugar to enhance the flavor of the fruit, not completely overwhelm it. This pie is good on a summer day - especially for breakfast!

Glacé Strawberry Pie

Ingredients
2 pounds strawberries (1 quart)
8 ounces cream cheese (I usually use Neufchatel, because who can tell the difference?)
1 cup sugar (anywhere between 3/4 cup and 1 1/4 cup, depending on how sweet your berries are)
3 Tbsp corn starch

Instructions
Pre-bake a 9" pie crust and allow to cool. My pie crust recipe is as follows:
Ingredients
1/3 cup shortening
1 cup flour
1/2 tsp salt
2 1/2 Tbsp water

Instructions
Cut the shortening into the flour and salt until well mixed and crumbly. Add the water all at once, and mix until it forms a ball. Roll out until it's the right size to fit in a 9" pie plate. Prick all over with a fork to prevent bubbling, and then bake at 425 degrees for 10 minutes.  I'm not sure why people make a big deal out of pie crust - it's quite simple in my experience...

Spread the bottom of the crust with the cream cheese. Hull all the strawberries and sort into two equal size piles. One pile should contain the nice looking berries, and the other should contain the over-ripe and under-ripe berries. Wash and the nice looking berries and slice them in half (unless they are very small). Cover the cream cheese with the sliced berries (cut side down if you want it to look nicest).

Strawberries on top of cream cheese

In a 3 quart sauce pan, combine the remaining berries with the sugar and corn starch. You will need to mash these berries up until they are pretty smooth. I use our potato masher, when I can rescue it from being used as a tool for manipulating Play-Doh. You could use an immersion blender or a food processor if you want a very smooth sauce, but I don't mind a few chunks. Now bring to a boil and cook for a couple minutes while stirring. I pour the hot sauce directly onto the berries in the pie plate and then refrigerate until well-chilled.

The finished pie

Aioli (Garlic Mayonnaise)

My kids are really into baked potatoes.  Well, actually, mashed potatoes is what they like, but baked potatoes are fine because they're easy to mash.  Actually, I'm not so sure they even like the potato part.  Like me, they seem to prefer all the stuff that one traditionally puts onto the baked potato.  Sour cream, cheese, butter, and those artificial bacon bits.

That's ok, but I don't actually like potatoes all that much, and I get tired of the same topping every time.  So I decided to try my hand at making aioli as a topping.  This is a garlic-flavored mayonnaise.  Having never made mayonnaise before, I decided to give it a try.  The basic ingredients are egg yolk, oil, sometimes mustard, and a little acid.  Some folks use the whole egg, and some recipes only call for the yolk.  In any case, I've read that an immersion blender can make mayo quickly and easily, so I decided to give it a try.

The key seems to start with the egg yolk and a very small amount of oil, build the emulsion, and then gradually add the remaining oil.  Otherwise it's nearly impossible to get the mayo to stiffen or hold in an emulsion.  I had a couple failed attempts, and finally got it right.

Aioli

Ingredients
1 egg, preferably at room temperature
2 tsp Dijon mustard
1 Tbsp lemon juice
5 cloves garlic, peeled and roughly chopped
1 cup oil

Instructions
Combine the egg, mustard, lemon juice, and about 2 tablespoons of oil. Blend until it forms a thick emulsion. This took about 30 seconds for me. Then slowly add the remaining oil a couple tablespoons at a time, blending for a few seconds each time to incorporate it. Add salt to taste.

I used the resulting aioli to create a bleu cheese salad dressing as well as for a potato topping. Pretty good, but actually too much raw garlic flavor. I think next time I'd cut back on the garlic or cook it slightly to soften the bite.
Yukon Gold baked potato and salad with garlic-bleu cheese dressing

Saturday, April 30, 2011

Bagels at Home

Finished Bagels - Front: Plain - Rear: Asiago cheese

Ok, so I don't live in NYC, or anywhere near there. I've never had a "real" New York bagel. However, I can sure tell you that those things you get in the plastic bag at the grocery store in the refrigerator section that are called bagels, aren't.

I've tried several times to produce a good bagel following various recipes I've found, and usually I've been pretty disappointed. The resulting bagel is either too soft, too dry, too yeasty, or too lumpy. Finally I gave in and tried Peter Reinhart's recipe from The Bread Baker's Apprentice. I've tried it before with mixed luck, but this time things turned out great. I'm not entirely sure what the difference was this time; perhaps I just was in the right frame of mind to get it right.

The key here seems to be really working the flour into the dough, working in at least two stages, and thoroughly kneading the dough (I didn't really knead enough this time... I promise I'll do more next time!). This is at least an 8-hour process, although most of it is spent just allowing the dough to do its thing.

Classic Bagels

Ingredients for Sponge

1 tsp instant yeast
4 cups bread flour
2 1/2 cups water

Instructions for Sponge

Mix together the yeast and flour, add the water, and stir until smooth. Then let this sit, covered, for about 3 hours. The mixture should be quite bubbly at this point.

Ingredients

1/2 tsp instant yeast
3 1/2 cups bread flour
1 Tbsp salt
2 tsp dry malt extract (or substitute any sugar)

Instructions for Dough

Add the additional yeast, 3 cups of flour, salt, and sugar. I used dry barley malt extract that I have available from my home brewing adventures, but I think any sugar would do the trick here. The idea is that the sugar helps to caramelize and give a nice brown color to the bagel as it bakes. I used my KitchenAid mixer to work the additional ingredients in. It's really a little overloaded for the advertised capacity of the mixer (six cups flour), as well as being a stiff dough, so I just mixed until the flour was incorporated and then went to knead on the counter with the remaining flour. Knead until completely smooth (I only kneaded for a couple minutes, and I regret that. I should have done at least five or six).

Divide the kneaded dough into 12 pieces, place on oiled parchment paper (I have these wonderful re-usable teflon sheets that I use instead), and cover. Allow the dough to rise an additional half hour. At this point you're ready to shape the dough.

Shaping the Dough

The easiest way to shape the dough is to roll the divided pieces into a ball, and then push your finger right through the center. Then work the dough around your finger until it resembles a ring. After you've shaped the bagels, put them back on the parchment paper and cover again. At this point you can either refrigerate for up to 24 hours, or just continue to let them rise for another three or four hours. You want to make sure they don't over-rise, or they will deflate when you boil them. I think this is unlikely if you make sure you have kneaded the dough enough, and put in enough flour.

Boiling and Baking

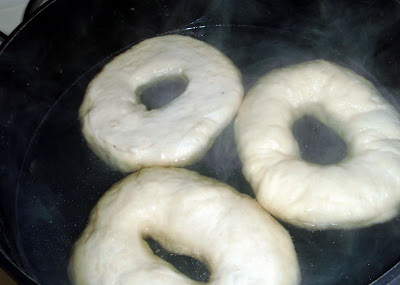
Finally comes the interesting and fun part - turning these lumps of dough into a bagel. Preheat your oven to 500 degrees, and start a large pot of water to boil. Once the water is boiling, add about a tablespoon of baking soda. This addition of a base gives the outer crust of the bagel a distinctive flavor - soft pretzels are a similar process but I think usually use a more concentrated amount of baking soda. You'll want the water to be boiling pretty vigorously and a large amount of water so the temperature doesn't drop too much when you add the bagels. Carefully lift the bagels off of the parchment and lower them into the water with a slotted spoon. They should float quickly. Allow them to boil for one minute, then turn to the other side and boil for another minute. Return them to the parchment paper. You can add seeds or other toppings immediately after boiling.

Boiling the bagels

Once you've boiled all of the bagels, it's time to put them in the oven. Bake for five minutes, reduce your temperature to 450 degrees and rotate your baking pans to ensure a more even baking process. After another 5 minutes, the bagels should be fully baked - now just keep an eye on them and bake until they're as brown as you desire. For me that was another five or six minutes, for total baking time of about 15 minutes. Cool on a wire rack and enjoy!

Thursday, April 14, 2011

Baking with spent grains: Peasant Loaf

My previous post described a quick bread recipe using some spent grains leftover from beer brewing.  Here's a slightly more involved recipe for a slow-rise bread that also incorporates spent grains.

I've been doing a lot of slower rise yeast breads over the past few years.  The concepts that Jim Lahey pioneered with his no-knead baking techniques are really remarkable.  This recipe doesn't slow things down that much, and I don't bake in a closed container.  It is actually a fairly traditional standard bread recipe with the yeast reduced for a slower rise to help develop flavor.

Slow Rise Spent Grain Peasant Loaf

Ingredients

2 cups wet spent grain
3.5 cups bread flour
1 cup water
1 tbsp salt
1 tsp dry yeast

Preparation

Mix all ingredients until you have a fairly homogeneous dough. You may need to add a little more flour or water depending on how wet your spent grain is. This should be a fairly soft, wet dough that pulls away from the side of the bowl if you add a little more flour to the surface. Cover the dough and let it rise at room temperature for about 6 hours, until doubled in size. Punch the dough down and shape into 2 round loaves, and let rise for another 2-3 hours or until nearly doubled. Slash the tops of the loaves and bake in a preheated 425 degree oven for about 35 minutes. I pour a couple cups of boiling water into a roasting pan on the floor of the oven right after I put the bread in - this steam helps the bread rise nicely in the oven and develop a good crust.


Baking with spent grains: Boston Brown Bread

I've been doing some beer brewing recently - in the past I've had ok luck using malt extracts, both dry or liquid.  But this Christmas I got a partial-mash kit as a gift, so I thought I'd give it a try.  Pretty simple to do, but in the end I wound up with about 4 cups of spent grains - crushed, malted, roasted barley.  It seems like a waste to throw out this stuff, even though it has served its purpose for the beer.  So I did a little research into what could be done with these spent grains, and came up with a lot of very vague ideas and recipes, but nothing real concrete.  Many of the recipes out there use just a small amount of the spent grains, so I thought I'd try out something that uses a more significant volume.  Bread seems like the obvious choice to start with, since you can throw almost anything into a bread dough and it will turn out fine.
Spent grains from brewing


The natural sweetness of the spent grain combined with the rich flavors of the darker roasted barley (I had a Scottish ale kit that included lots of chocolate malt and roasted barley) pointed me towards a dark heavy bread, and the natural quick bread that fits that bill is Boston brown bread.  Mark Bittmann's excellent How to Cook Everything has a good recipe for this; I just reduced the liquid a bit to compensate for the very wet grain, and made two 9x5 loaves:

Boston Brown Bread using Spent Brewing Grains

Ingredients

3 1/2 cups all-purpose flour
1 cup corn meal
2 cups spent grain (wet)
2 cups milk
4 tbsp vinegar
1 tbsp salt
2 1/2 tsp baking powder
3/4 cup dark molasses
3/4 cup corn syrup

Preparation

Preheat oven to 300 degrees. Grease two 9x5 inch bread pans. Combine milk and vinegar and let sit while mixing dry ingredients. This will provide an acidic base to help with leavening the bread. You could use buttermilk instead of the milk and vinegar - I've had good luck with buttermilk powder as well (you can find this in the baking aisle of most grocery stores if you look carefully). Then add the spent grain and sweeteners (I used half corn syrup because I ran out of molasses). You will wind up with a fairly thin batter, but it will firm up as it bakes. Bake for about 70 minutes, and then allow to cool for a few minutes before removing from the pans.

This is great served with beans or spread with cream cheese - or just eaten straight with butter.
Boston Brown Bread